Cosmostreamer Wired for DJI Zenmuse gimbals - Assembling instruction
You can assemble it for free, but you have to buy a license! Go here
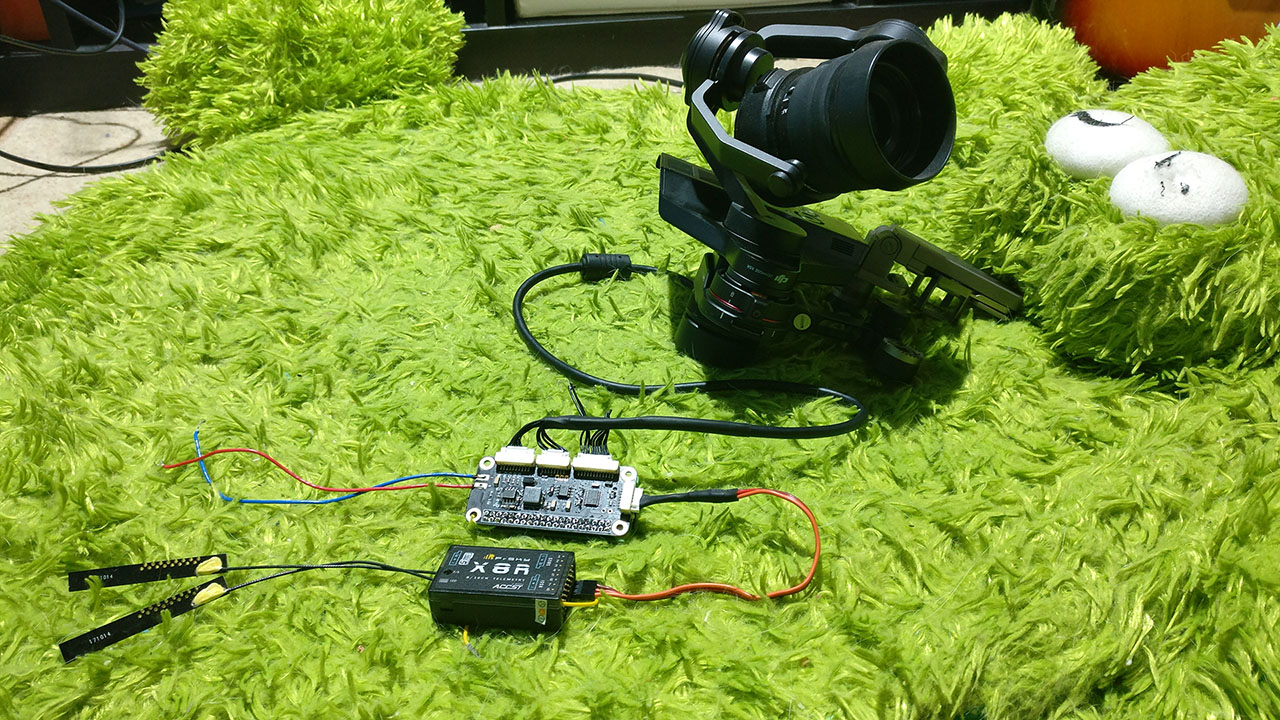
photo: Cosmostreamer Wired with Companion Board and DJI Osmo extension cable and X5R
- Video instruction
- Required list
- Basic assembling
- License key
- Software update
- Companion Board
- Gimbal connection
- RC receivers connection
- Custom I2C joystick
- Camera shield
- Config file
- Network access
- Downloads
Video instruction
Not ready yet :-(
Required list
- Raspberry Pi Zero 1.3 or W. I recommend RPI Zero W (with internal Wi-Fi)
- MicroSD card (4Gb min)
- CAN-adapter
- Quartz oscillator
- DJI camera adapter. Variants available:
Basic assembling
1. Download ZIP-archive with microSD card image, cosmostreamer-wired.sdcard.img.zip
2. Extract .img file from downloaded ZIP archive
3. Write .img file to microSD card. Use Win32DiskImager application, or any other, that can write images
3.1 If you already has license key - you can install it on microSD card (how to)
4. Insert microSD card into Raspberry Pi Zero
5. Ok, basic assembly is done. Now power on Raspberry Pi Zero (5V on micro-USB power port), it must start booting.
6. After boot ended HDMI will show something like this:

"Bad license key" message means license key wrong or absent. In the bottom left corner message contains Raspberry Pi serial number and Cosmostreamer application version. Camera connection not worked without license key.
License key
For full Cosmostreamer functionality license key is needed. It is a small string stored in file /boot/license.txt on microSD
At the current time there is no automatic key retrieve system. So you need to send e-mail to cosmostreamer@gmail.com. Please, specify a serial key of you Raspberry Pi (see on HDMI on bottom-left corner) and your PayPal account in this e-mail. I will issue a bill for payment and after payment i will send you a license key for Cosmostreamer on your Raspberry Pi.
The license key is unique for each Raspberry Pi!
Options for installing a license key
- Use a CosmoViewer application for Windows.
- Insert microSD with written image into PC/laptop card reader. Operating system will detect a card. If your operating system is Windows - disk with label "boot" will be found. Just copy license.txt from e-mail answer on this disk.
Software update
When i fixing bugs or adding some features to Cosmostreamer application, i make a special file for update. You not needed to rewrite microSD card, you can just install update file. It is possible from CosmoViewer for Windows application, or from a web interface.
You need to download update file. Direct link: cosmostreamer.tar.gz. Change log and old versions here.
For update from Windows app:
1. Start a CosmoViewer for Windows
2. Right mouse click on window and select "Box settings" item in menu
3. Open tab "Info"
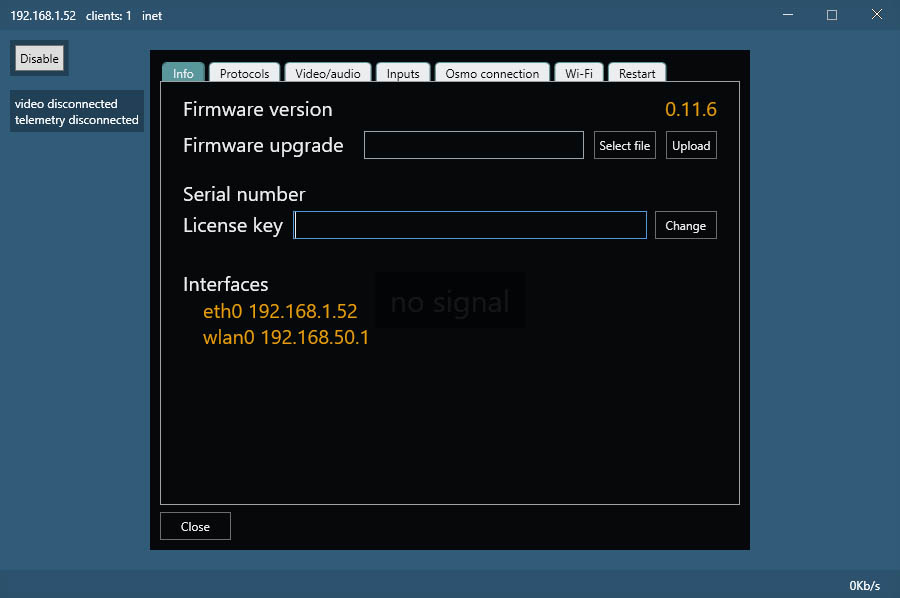
4. Click "Select" button near of "Firmware upgrade" label
5. Select downloaded file cosmostreamer-wired.tar.gz
6. Click "Upload" button. Update file will be send to a Raspberry Pi, after this update begins. After finish, Raspberry Pi will automatically reboot.
For update from web interface:
1. Open web interface:
- If you connected to Cosmostreamer Access Point: http://my.cosmostreamer.com/settings.php
- If you using OSX or iOS (or Windows with iTunes): http://cosmostreamer.local/settings.php
- Any other case - open link http://ip_address/settings.php
2. Open menu item "Info"
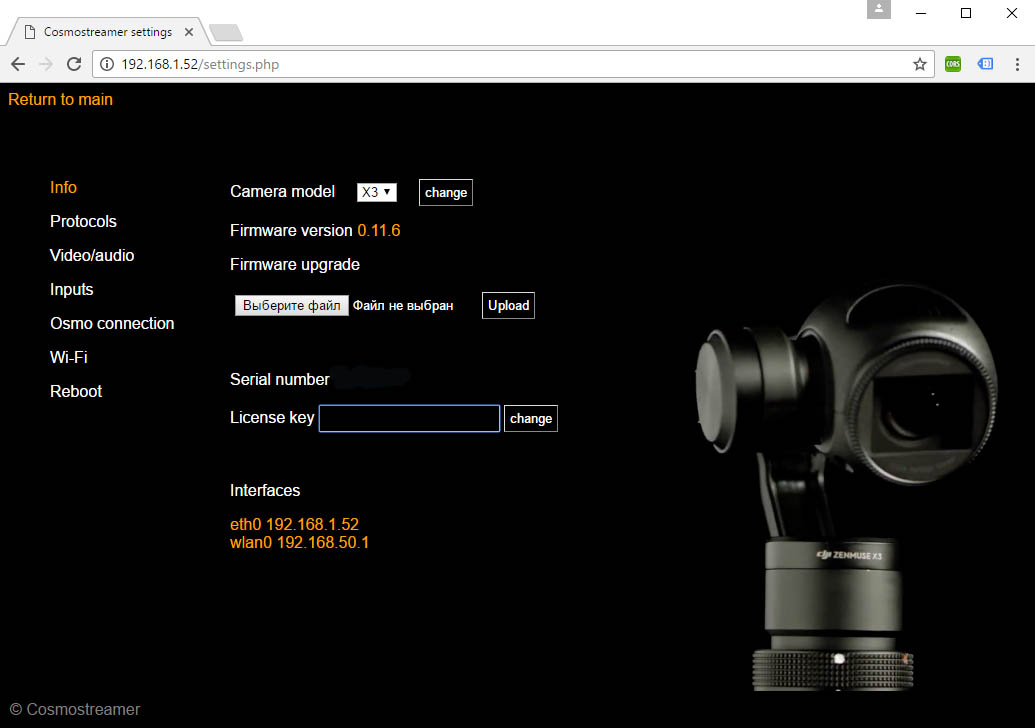
3. Click "select file" button. Select downloaded file cosmostreamer.tar.gz
6. Click "Upload" button. Update file will be send to a Raspberry Pi, after this update begins. After finish, Raspberry Pi will automatically reboot.
Companion Board
Easiest way to get Wired connection


Soldered directly to RPI Zero pins.
Contains power regulator (makes 5V from input 12-26V), CAN adapter, Sbus invertor, CAN terminal resistor, standard DJI 8 and 10 pin connectors, etc.
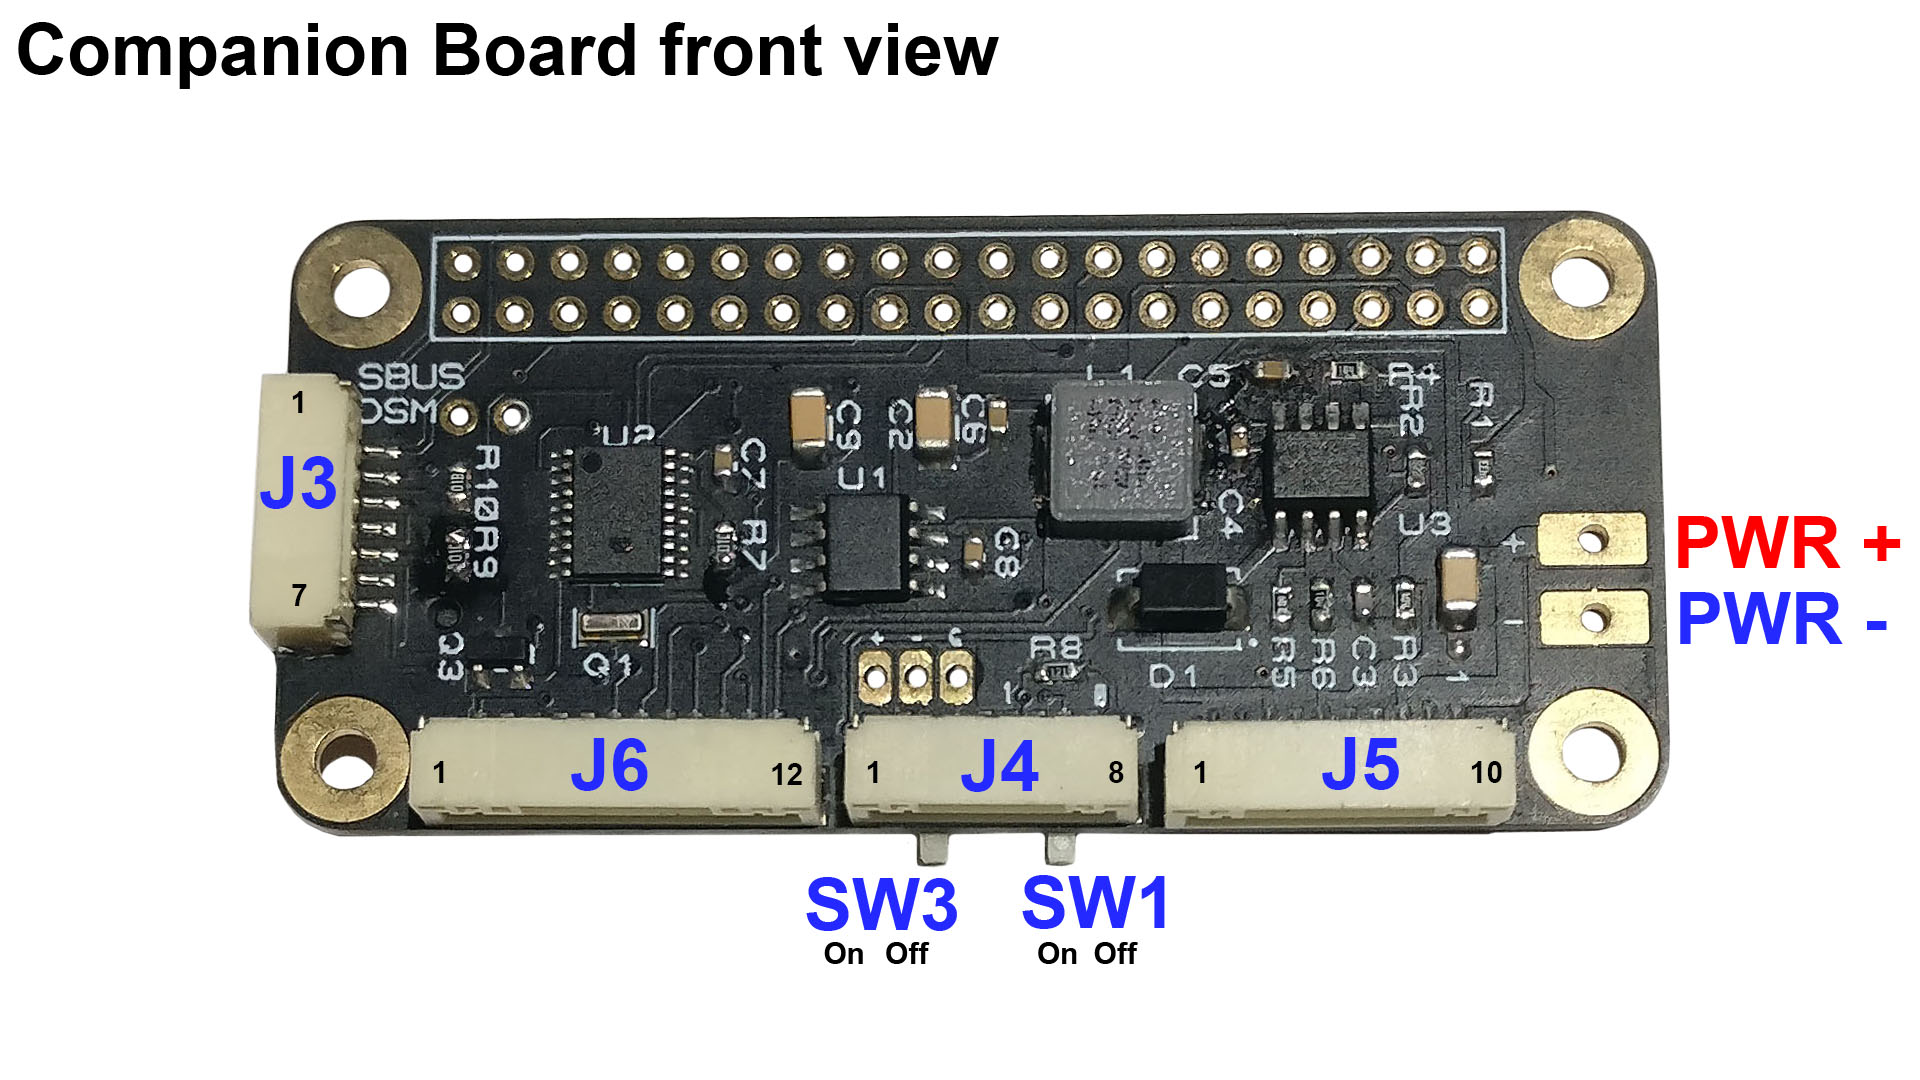
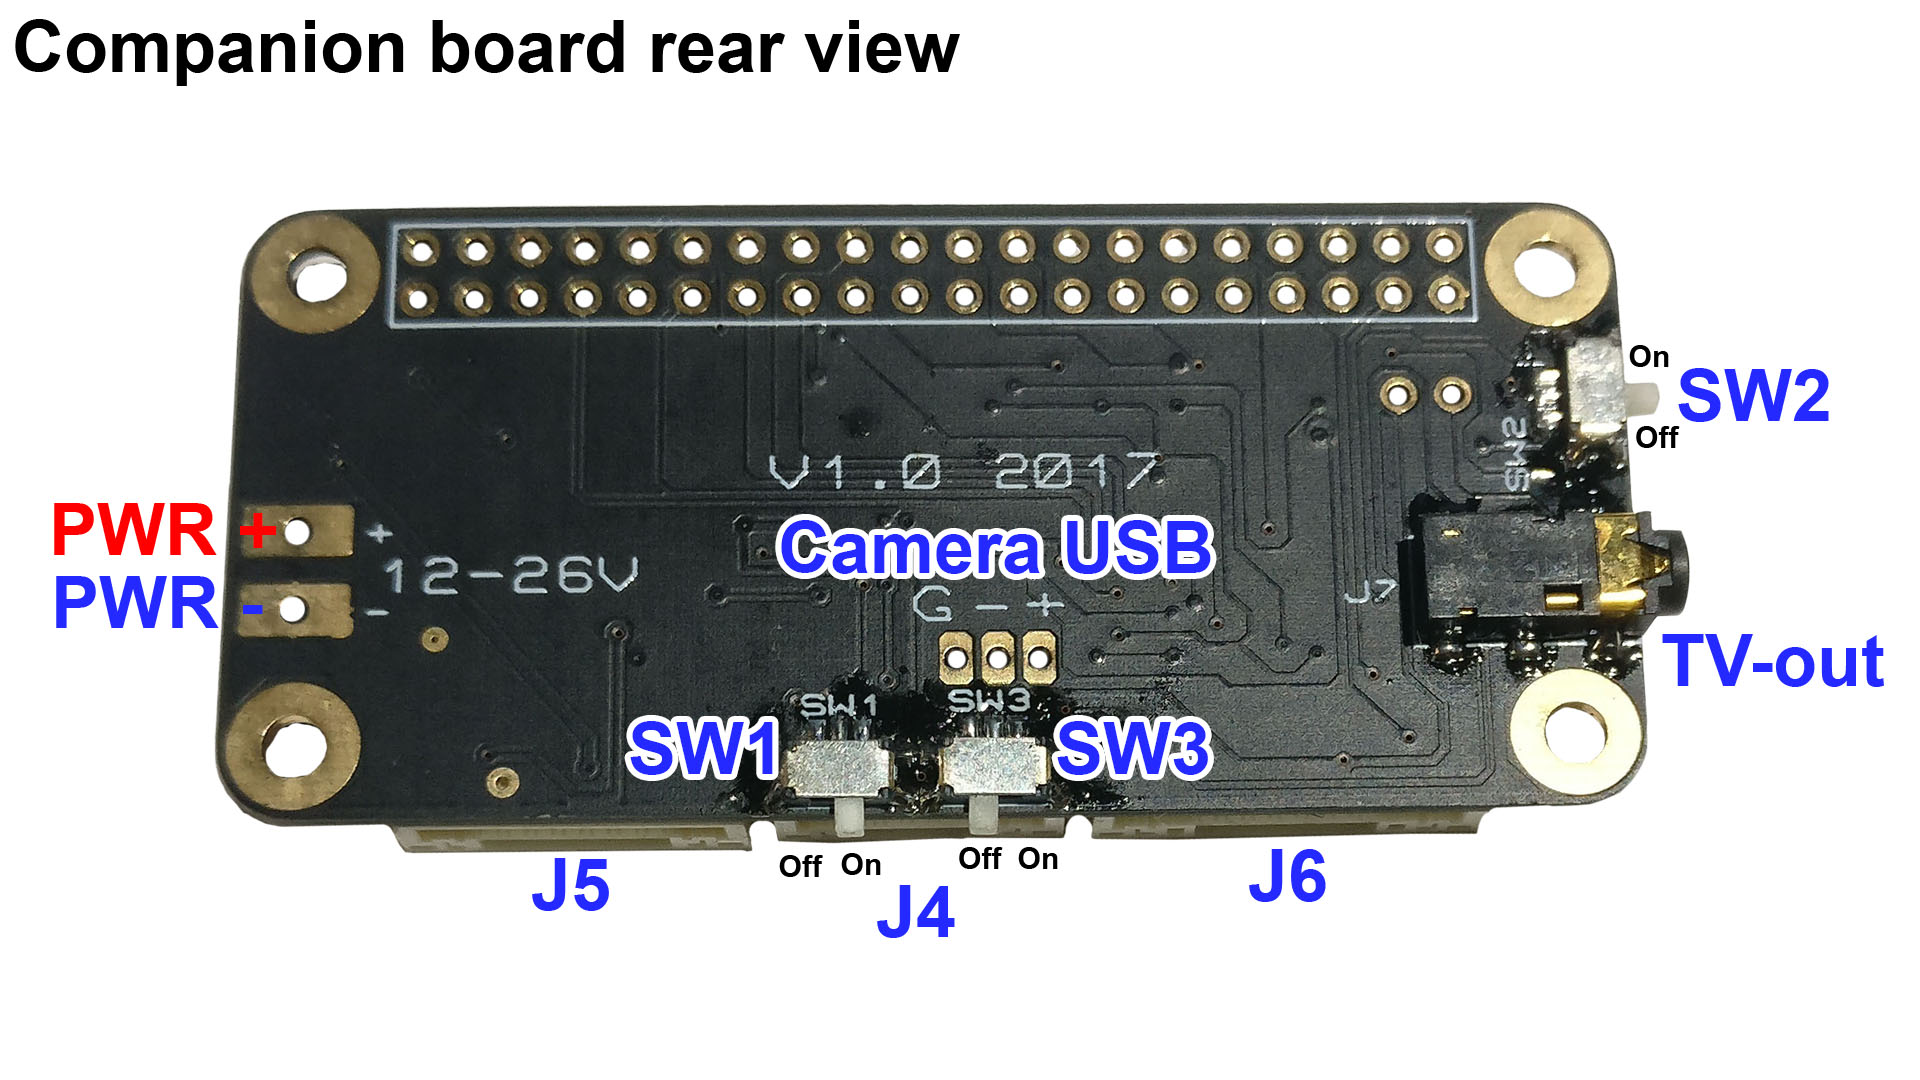
Companion Board connectors pinout
J3
| 1 | UART TX |
| 2 | UART RX / SBUS in |
| 3 | +3.3V output |
| 4 | GND |
| 5 | +5V output |
| 6 | I2C SDA |
| 7 | I2C SCL |
J4
| 1 | USB D+ |
| 2 | USB D- |
| 3 | USB GND |
| 4 | USB SWID |
| 5 | NC |
| 6 | NC |
| 7 | CAN LO |
| 8 | CAN HI |
J5
| 1 | NC |
| 2 | NC |
| 3 | +5V output |
| 4 | GND |
| 5 | GND |
| 6 | GND |
| 7 | GND |
| 8 | POWER SRC OUT |
| 9 | POWER SRC OUT |
| 10 | POWER SRC OUT |
J6
| 1 | Servo out |
| 2 | PPM2 in |
| 3 | GND |
| 4 | +5V output |
| 5 | RC1 ch1 |
| 6 | RC1 ch2 |
| 7 | RC1 ch3 |
| 8 | RC1 ch4 |
| 9 | RC1 ch5 |
| 10 | RC1 ch6 |
| 11 | RC1 ch7 |
| 12 | RC1 ch8 |
Companion Board switches
SW1
CAN terminal resitor enable/disable. ON = enabled, OFF = disabled. Just set it "ON" and forget.
SW2
Invertor for UART RX. ON = enabled, OFF = disabled. For SBUS input need to set it "ON"
SW3
USB selector (DM368/AMBA switch). ON = use DM368 USB, OFF - use Amba USB. Usable only with Inspire1 camera mount.
Connection scheme
Common basic connection scheme
For a basic features just a CAN bus and USB are needed.
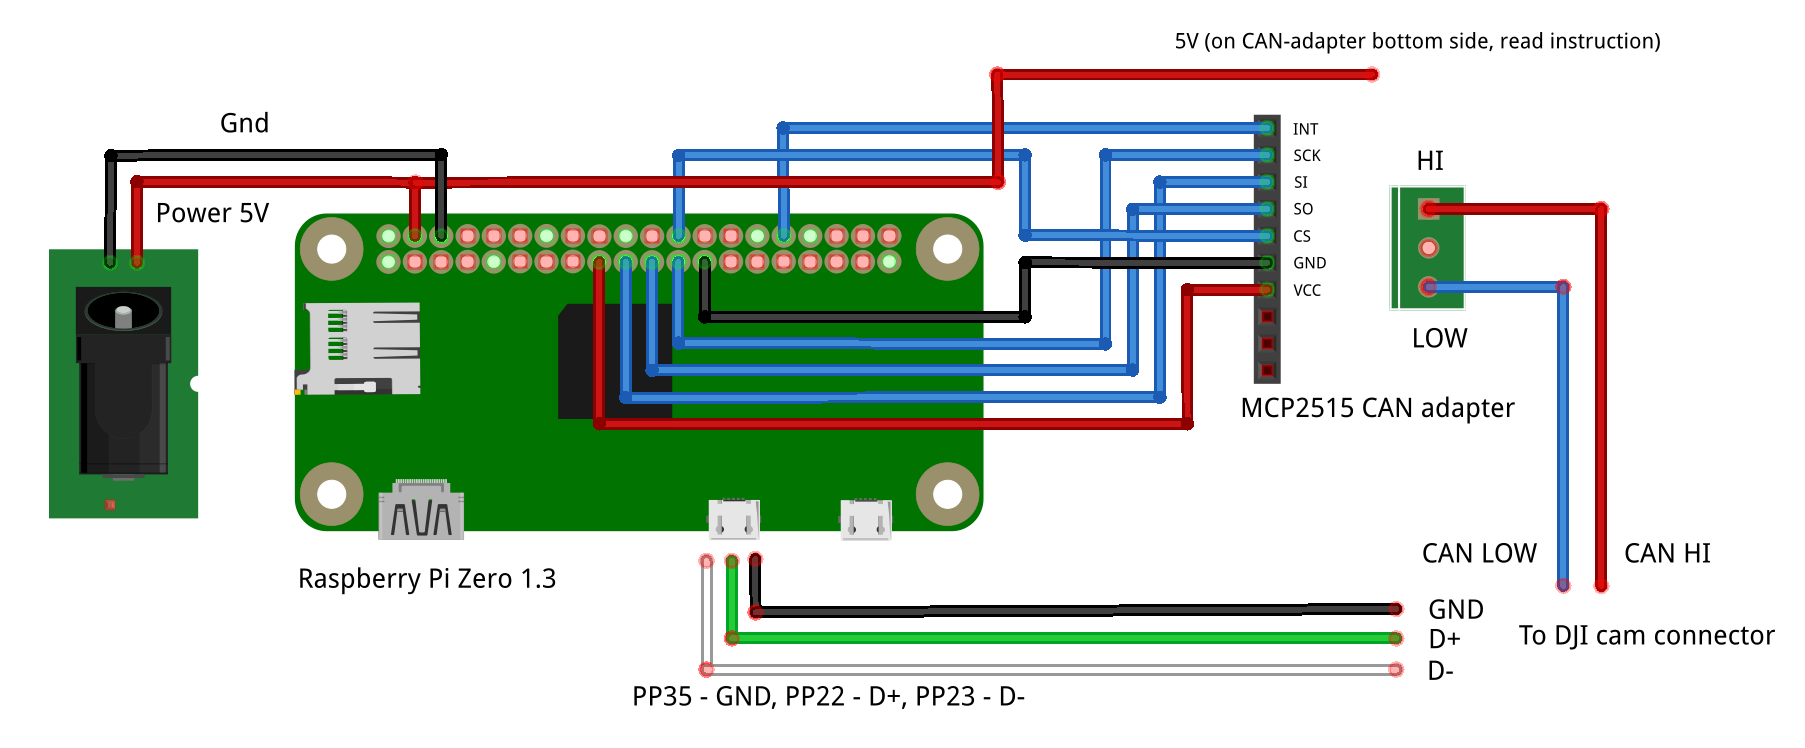
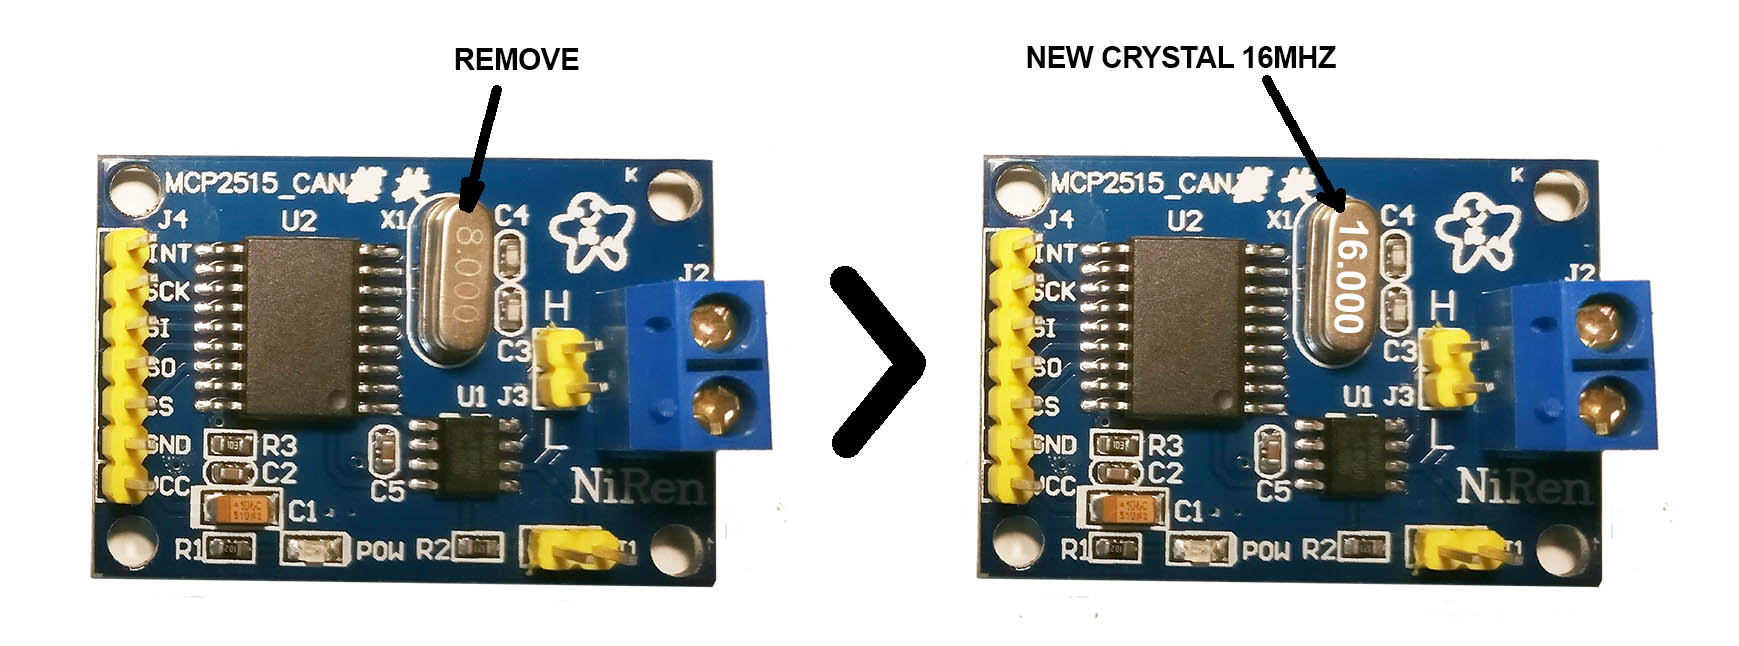
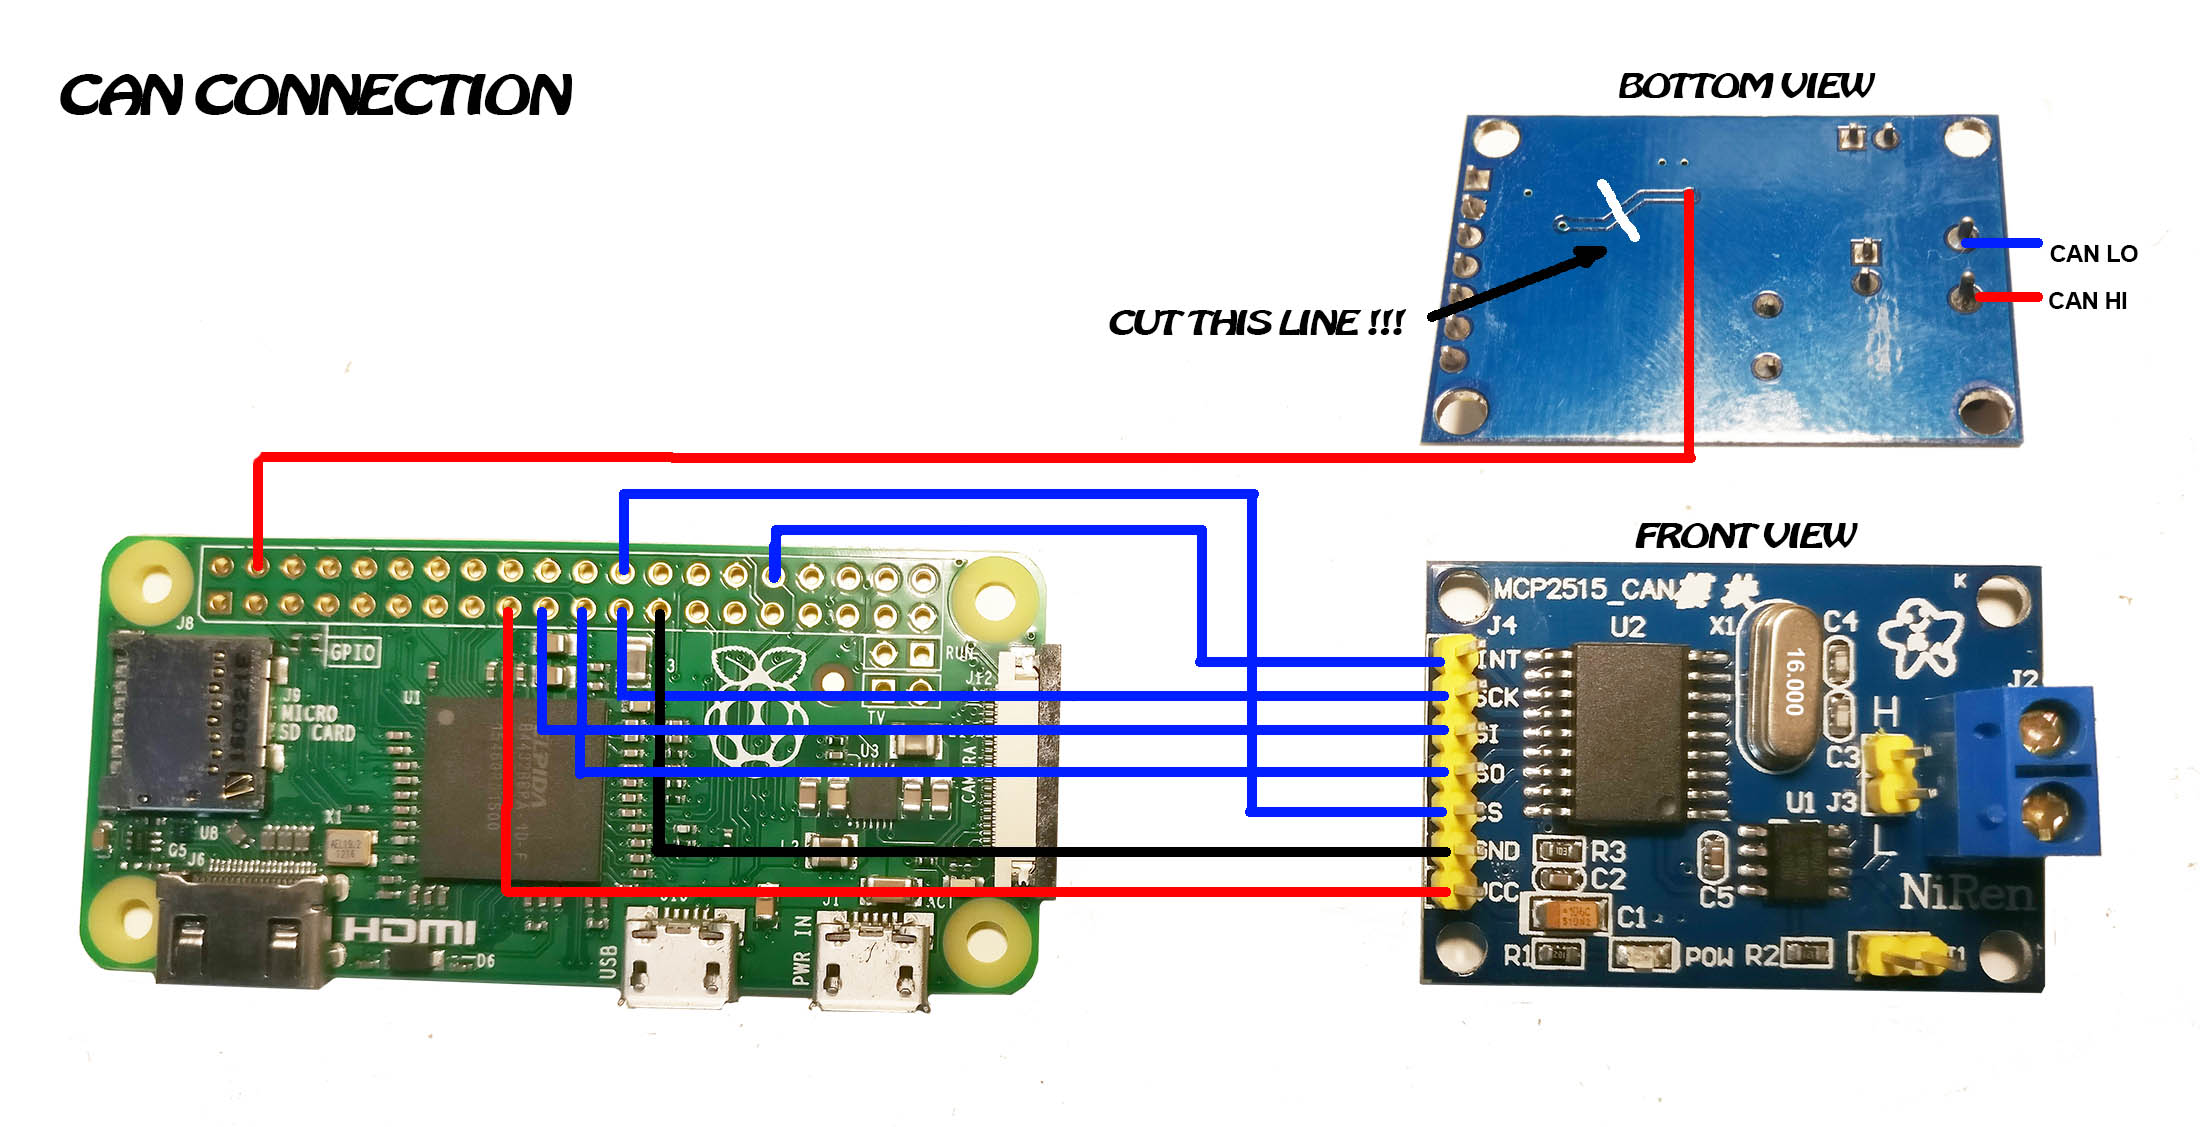
CAN-bus connection
Raspberry Pi Zero has no an own CAN-bus, so we need to connect a CAN-adapter (small MCP2515 based board).
1. Replace quartz oscillator on MCP2515 board. In stock there is a only 8Mhz crystal, but we need a 16MHz. Unsolder 8MHz and solder 16MHz crustal. It is easy, just two pins.
2. Connect MCP2515 board to Raspberry Pi Zero. DON'T FORGET TO CUT A LANE HOW IT DRAWED ON IMAGE.
USB connection
More easy than CAN. Just connect Raspberry Pi's USB and DJI camera connector.
Here is two variants. Use standart Raspberry Pi's micro-USB connector, or solder wires to solder points on back side of Raspberry Pi Zero.
1-st variant. Using a micro-USB connector.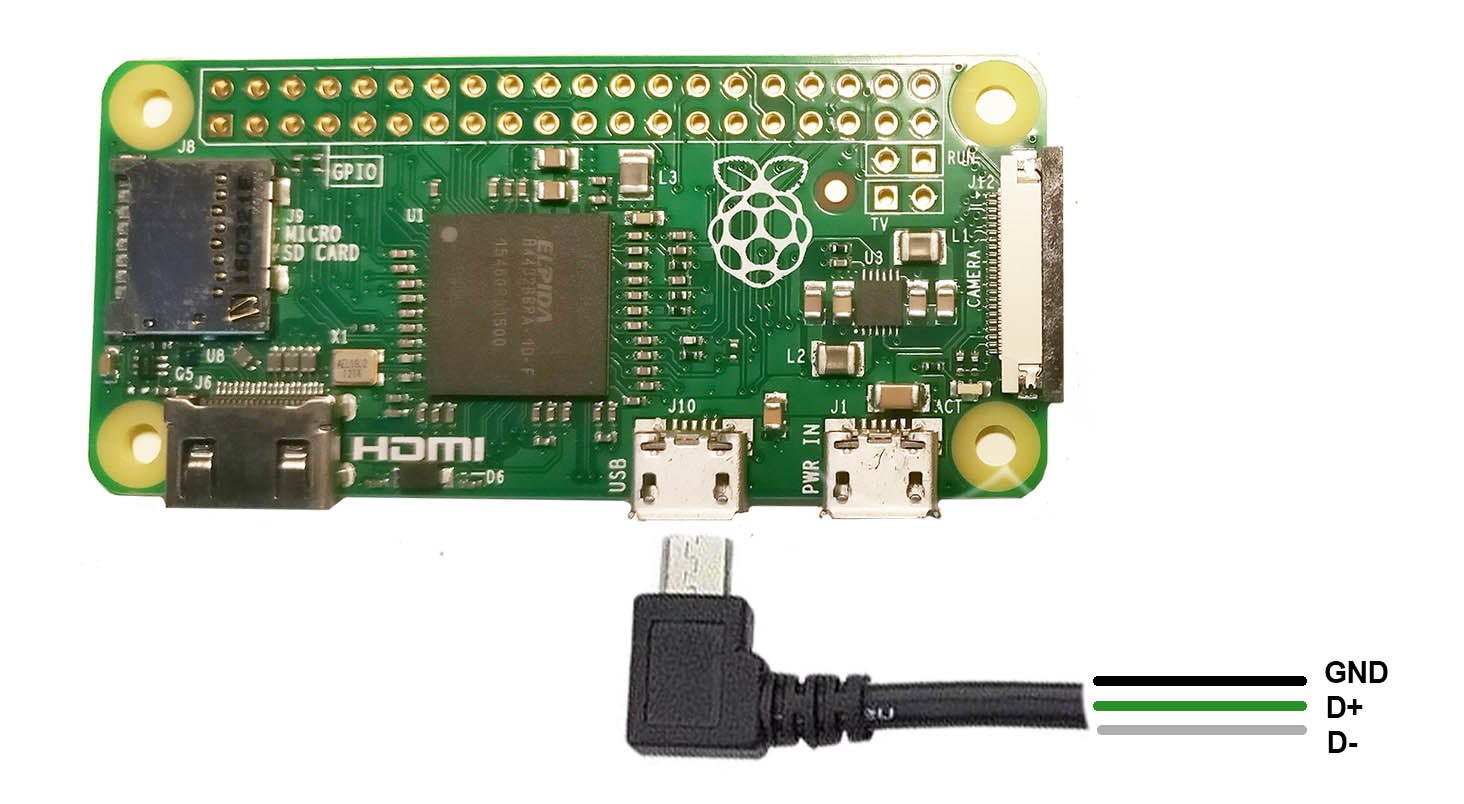
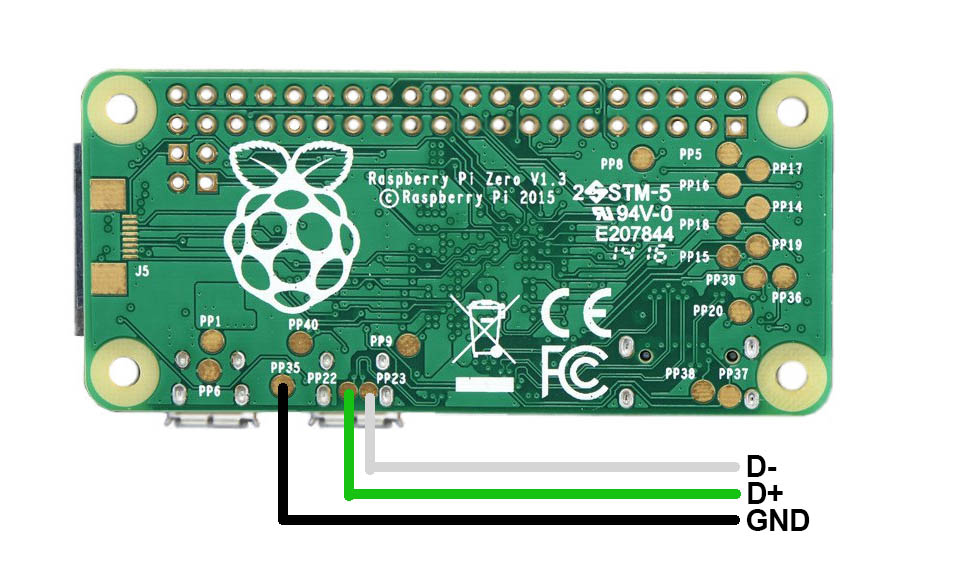
Gimbal conection
DJI cameras for Osmo or for Inspire 1 has an own connector, but with some differencies. X5/X5R can't be connected directly to Osmo connector, because the ring is some more than needed. Need to use a Osmo X5 adapter.
Osmo cams (X3 black, X3+ (Z3 black)) can't be connected to a M600 camera mount, because they can't operate in Inspire mode.
Connection with Osmo adapter has advantage - more cable length from Raspberry Pi Zero to camera, up to 1.5 meters long.
With an Inspire adapter maximum USB and CAN cable len from Raspberry Pi Zero to camera - around 20 cm. If more - video will be choppy or not be work. Better to use shielded cables.
With Osmo Extension Cable
Take the Osmo Extension Cable (DJI Osmo gimbal extension (part89))
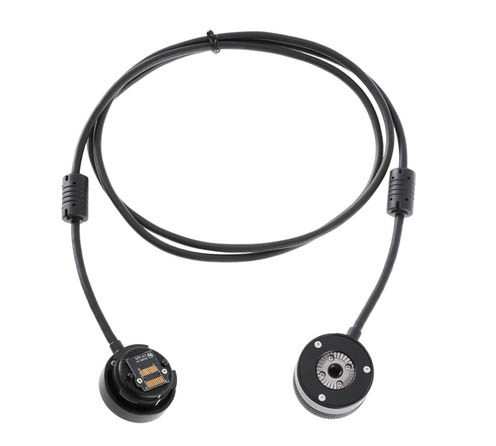
We need only female connector, cut on length that you want.
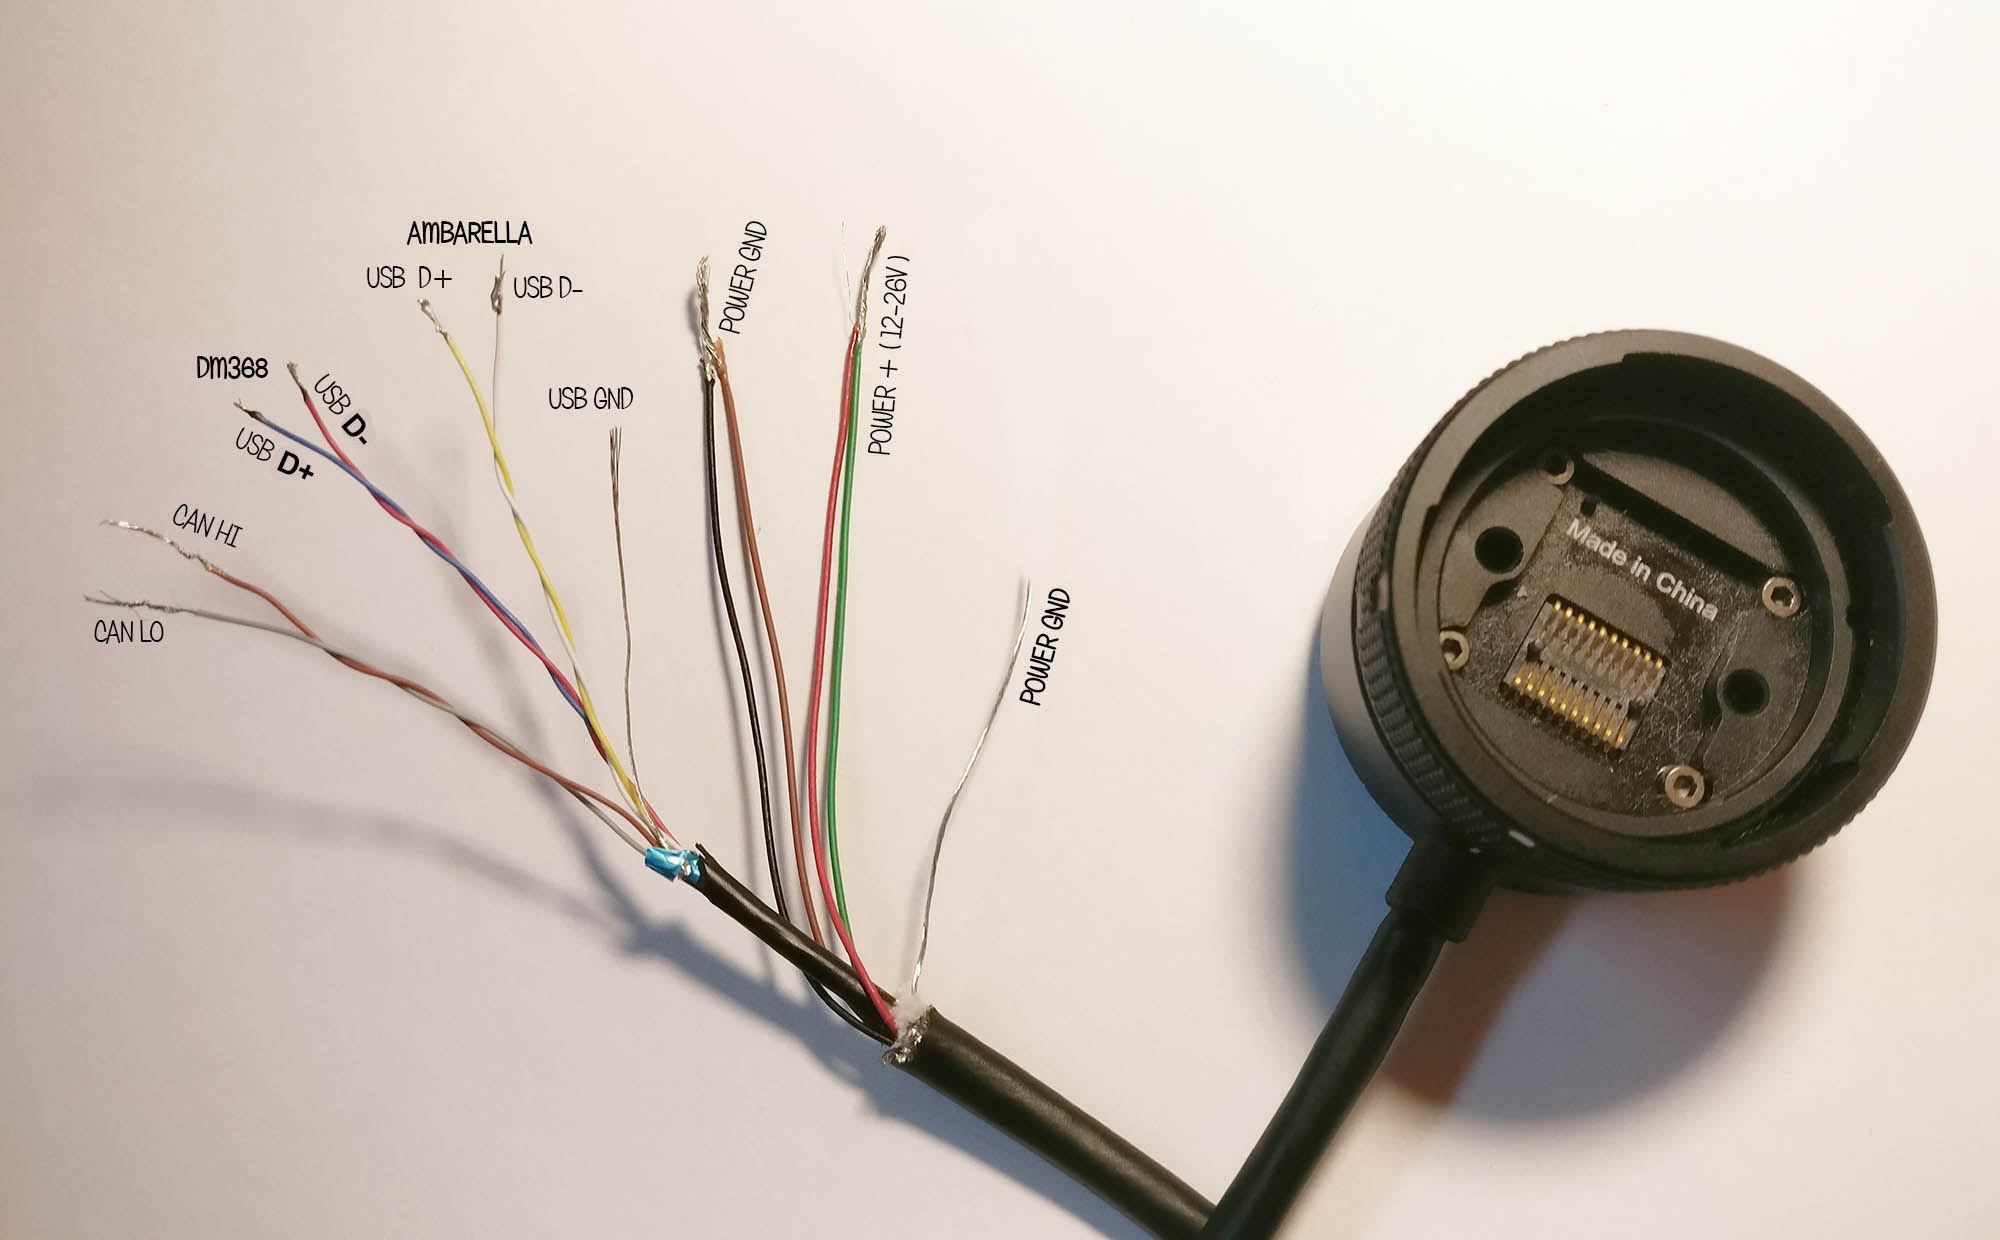
Cable pinout:
| Red, Green | Power + (12-26V) |
| Black, Brown thick | Power GND |
| Thin silver | USB GND |
| Thick silver | Power GND |
| Yellow | USB D+ (Ambarella) |
| White | USB D- (Ambarella) |
| Blue thin | USB D+ (DM368) |
| Red | USB D- (DM368) |
| Brown thin | CAN HI |
| Gray | CAN LO |
CAN HI and LO used for control commands and telemetry.
USB D+ D- (Ambarella) and USB GND used for video receive from Osmo cams X3 black, X3+ (Z3) black
USB D+ D- (DM368) and USB GND used for video receive from cams X3 white, X3+ white (Z3), X5, X5R
Connect wires with same names, USB wires or for DM368 or for Ambarella.

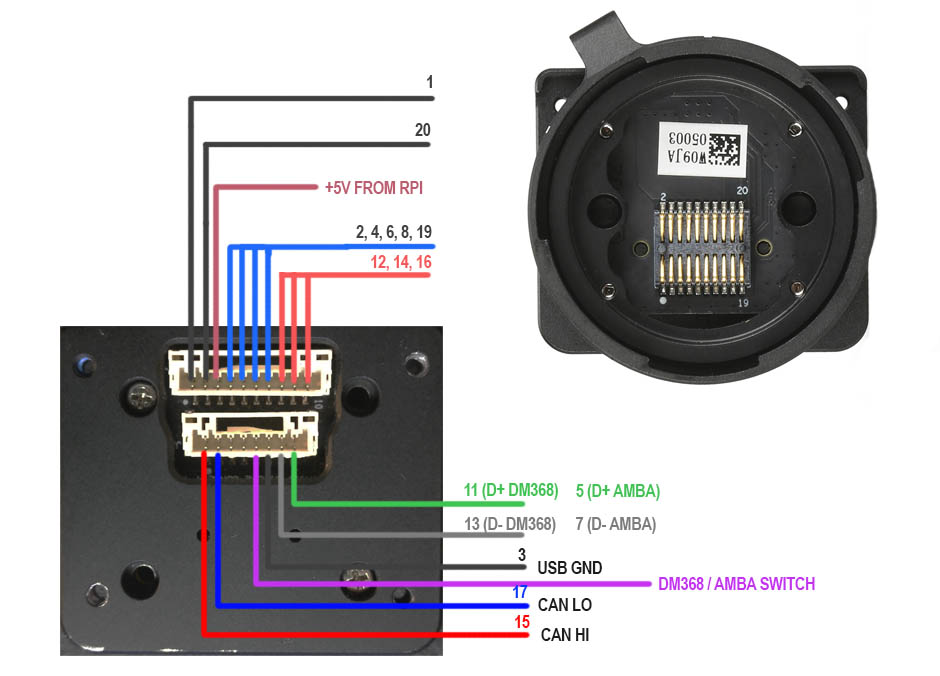
With Inspire adapter
Easy. 10-pin connector - for camera power. From 12 to 26 Volts. 8-pin connector - for USB and CAN.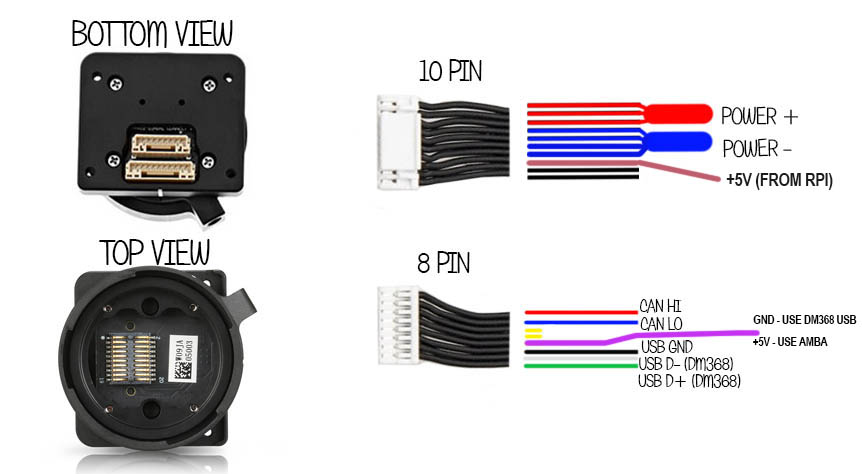
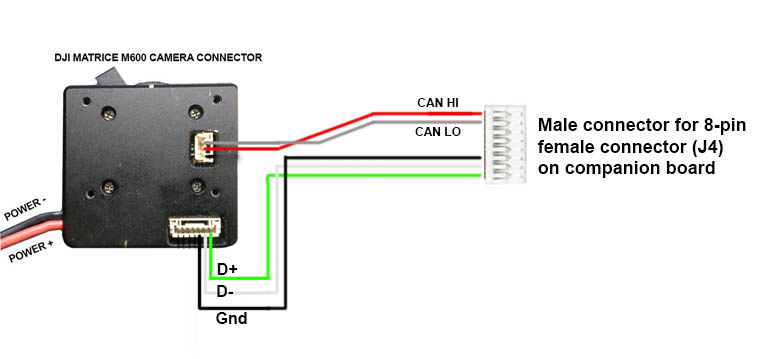
With M600 adapter
Only Inpire mode available
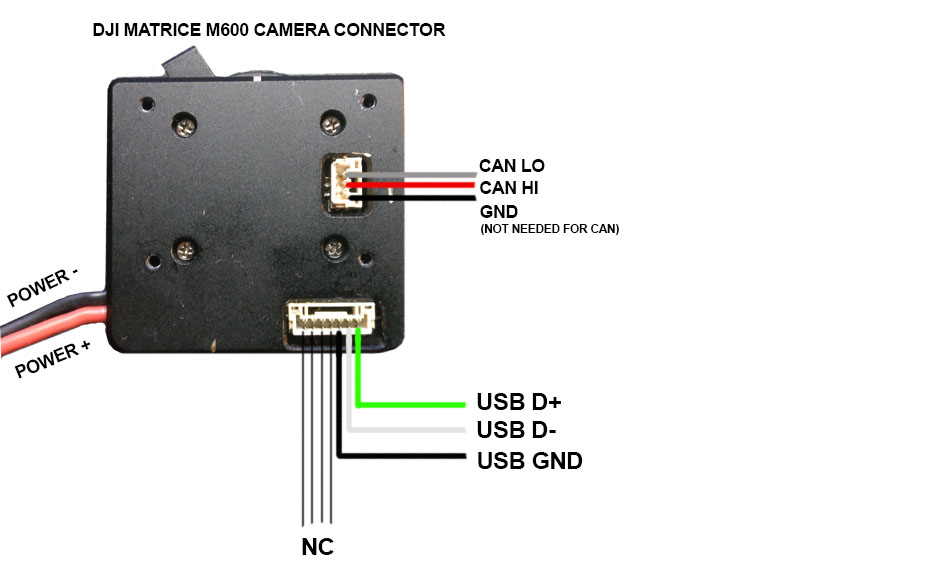
Cable adapter for M600 connection to Companion Board
RC receivers connection
Optional
One or two RC receivers can be connected. First RC can be PWM or PPM. Second - PPM or Sbus. Signal mode (PWM, PPM, Sbus) can be switched in web-admin page or in Windows application.

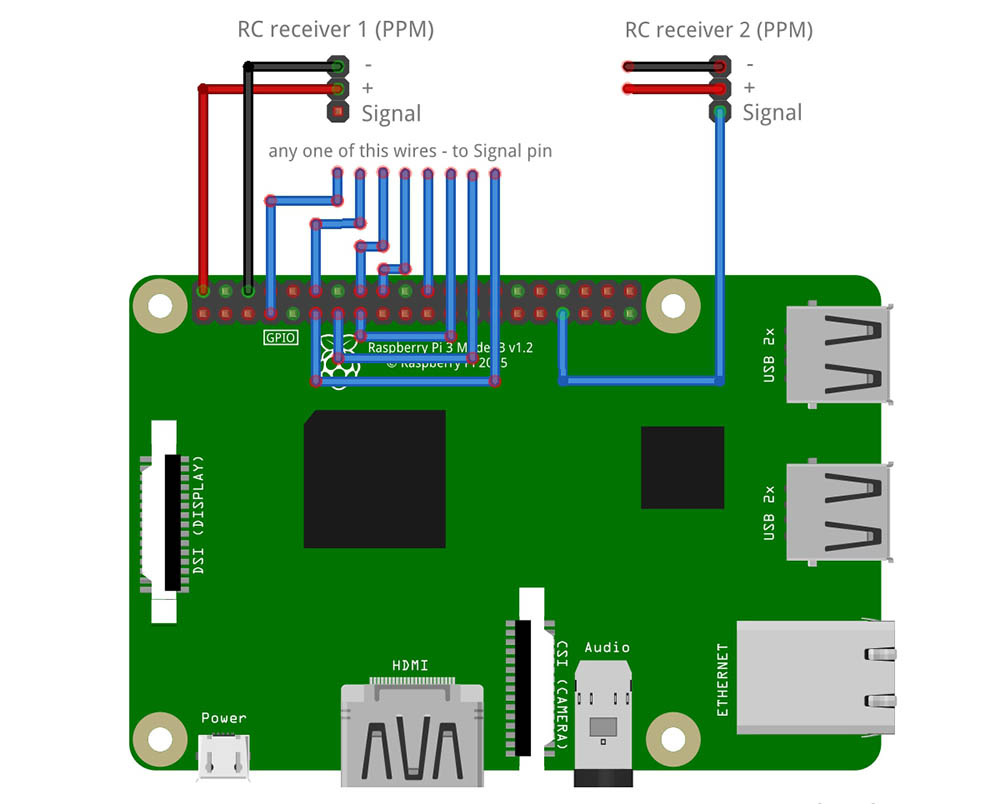
On this images RPI 3 is drawn, pinout is the same as on RPI Zero
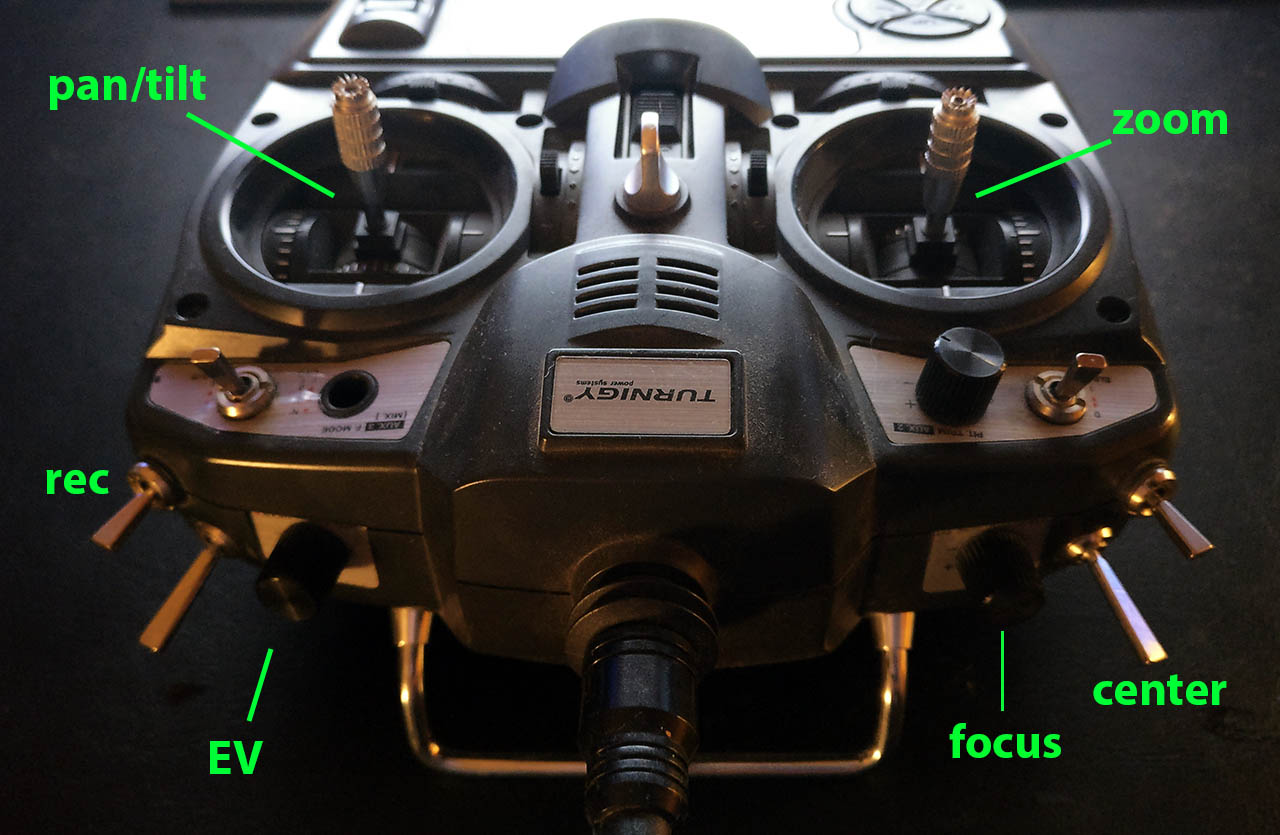
All channels are connected with the example for Turnigy 9X. Mode 2. Model type: Acro
Channels set-up
channel 1 - PAN
channel 3 - TILT
channel 4 - ZOOM (if supported)
channel 5 - (AUX-CH "GEAR") - RECORD
channel 6 - (AUX-CH "HOV THRO") - EV compensation
channel 7 - (AUX-CH "THRO HOLD") - MENU (labeled as CENTER on image)
channel 8 - (AUX-CH "HOV PIT") - MANUAL FOCUS (if supported)
Doesn't matter channels connection order. Any hardware channel can be mapped into any function in a web-admin page or in application
Need to enable auxillary channels in Turnigy settings. Enter menu, part "AUX-CH" and set values:
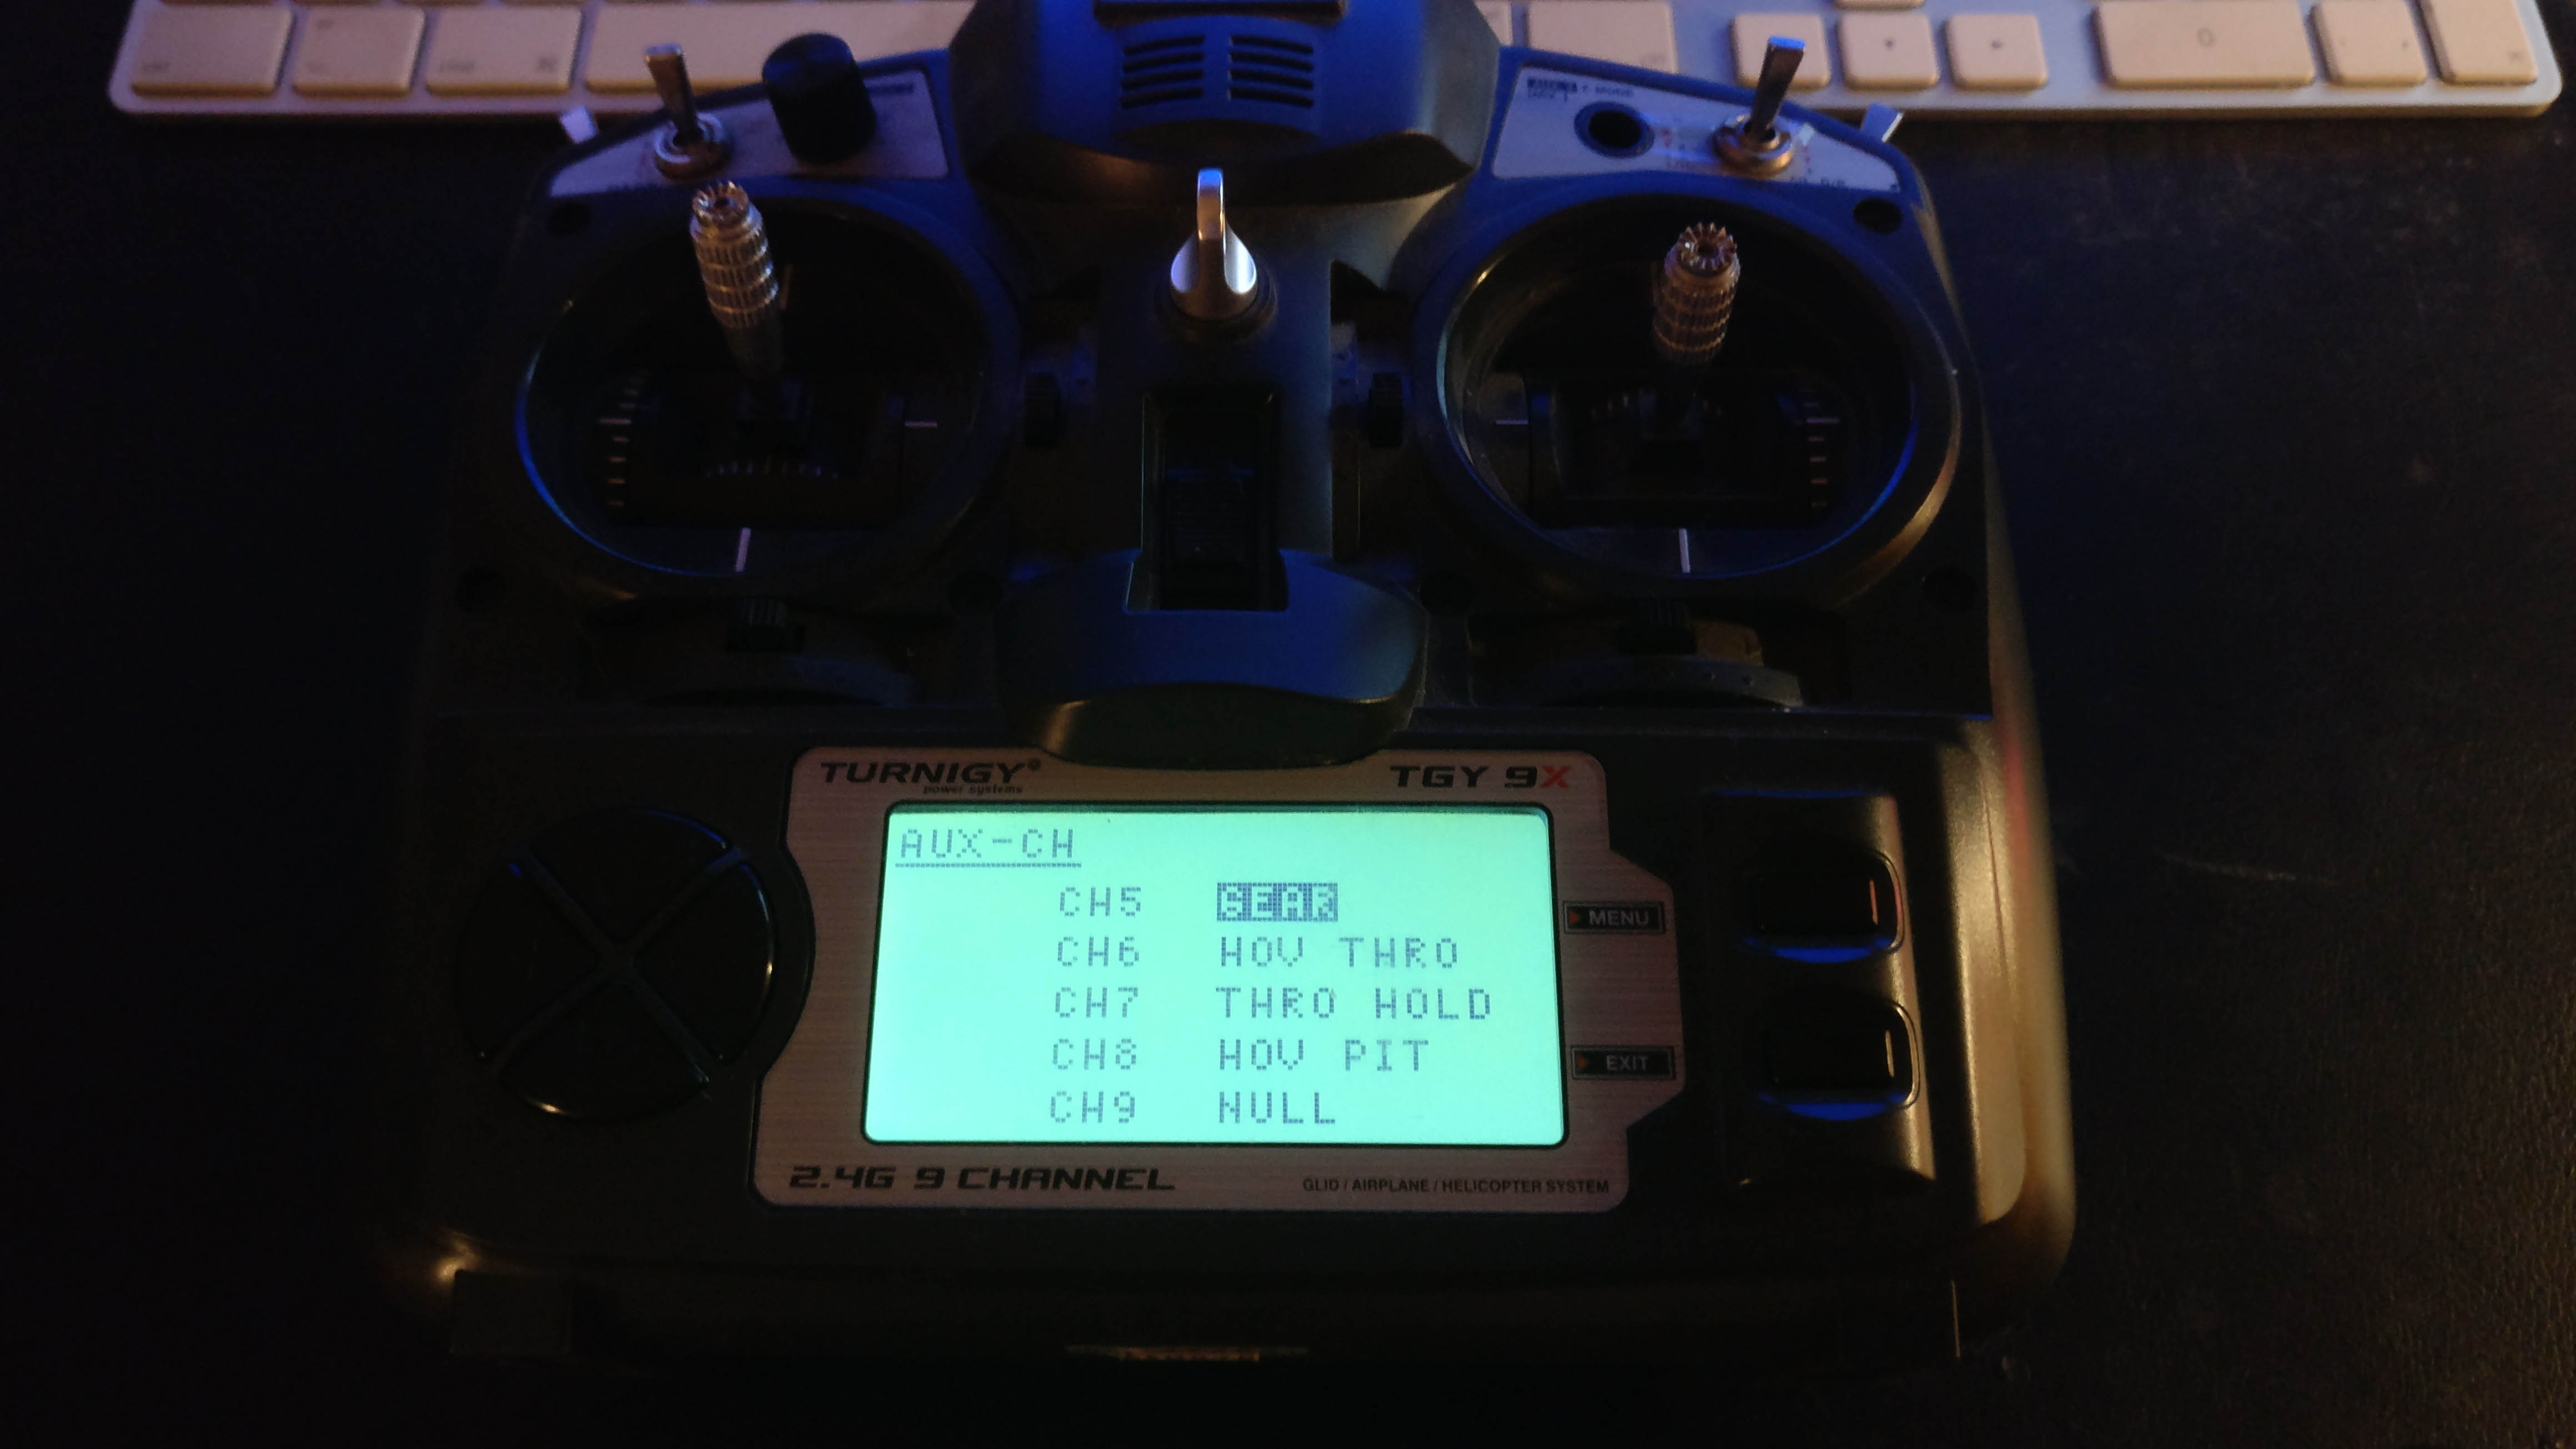
For another remote control system - read it's manual, how to set-up auxillary channels.
Don't forget to enable RC in Cosmostreamer settings. Menu -> "Inputs" -> "RC input enabled". After transmitter is powered on HDMI will show "RC calibrating" message. Near will be axis values shown. It was made for easy config. Check channels with my scheme.
Channels calibrating is at first transmitter power on. Need to move left and right stick up-down, left-right to minimal and maximal position. And rotate EV and FOCUS to min max position. After this calibrating is over. Move pan/tilt stick to down-left position and quckly release. All message for RC will be hidden. Normal working mode is on.
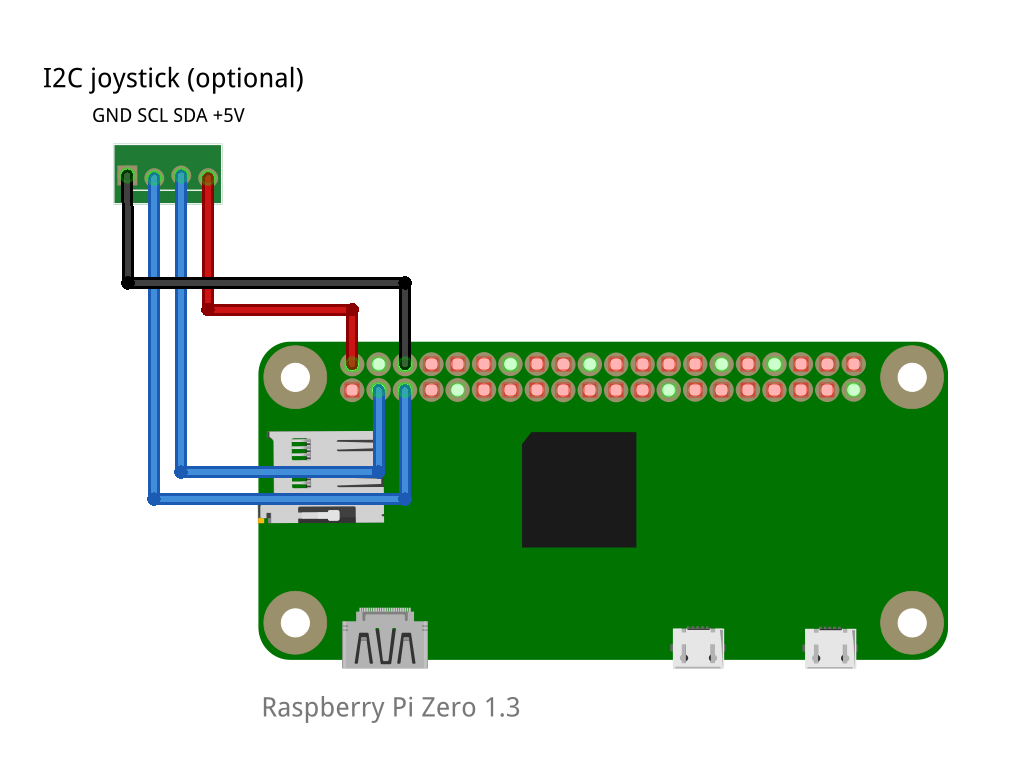
Custom I2C joystick
Optional
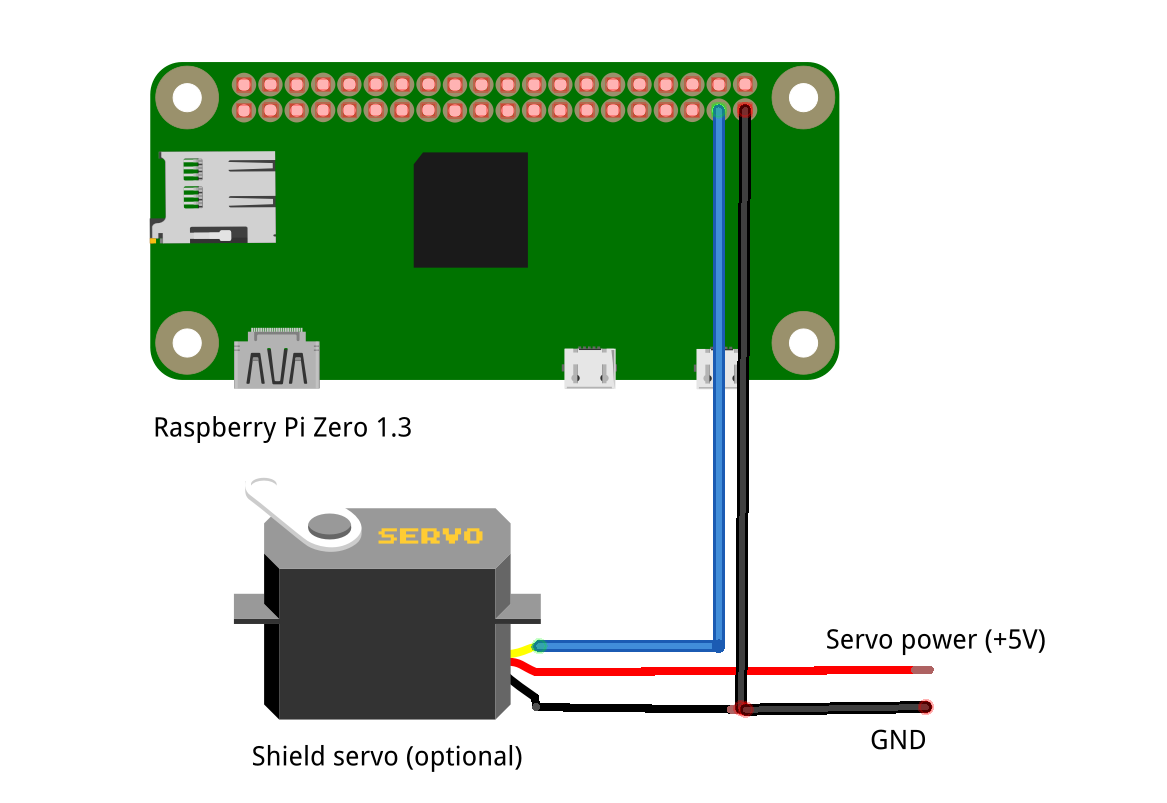
Camera shield
Optional
For camera mechanical protection motorized shield control supported. Shield automatically opens when photo or video recording is active and automatically closes after timeout (shield_timeout param in config file)
Config file
Cosmostreamer Wired settings saved in file /boot/cosmostreamer-wired.conf. It is a usual text file, which can be edited. You can insert microSD into card-reader and edit this file.
Config parameters description
Parameter names may be changed in a newer firmware versions
| Parameter | Description |
|---|---|
| disabled=0 | Run Cosmostreamer wired application at boot or not. Used for debug. 0 - run 1 - don't run |
| camera_type=0 | Camera type 0 - X3 black (from Osmo) 1 - X3 white, Z3, X5, X5R |
| device_mode=0 | Camera work mode 0 - as Osmo (always horizontal) 1 - as Inspire (free movement) |
| cooperative_mode=0 | Cooperative mode 0 - without Inspire flight controller 1 - with Inspire flight controller |
| control_enabled=1 | Camera control 0 - disabled 1 - enabled |
| hdmi_enabled=1 | Use HDMI or TV-out 1 - show video on HDMI 0 - show video on TV-out |
| rc_input_enabled=0 |
0 - do not use RC receiver 1 - use RC receiver |
| rc_input_speed_pan=100 |
Pan speed for RC receiver. From 0% to 100%. |
| rc_input_speed_tilt=100 |
Tilt speed for RC receiver. From 0% to 100%. |
| rc_input_speed_dutch=100 |
Dutch speed for RC receiver. From 0% to 100%. |
| i2c_input_enabled=0 |
0 - do not use I2C joystick 1 - use I2C joystick |
| i2c_input_speed_pan=100 |
Pan speed for I2C joystick. From 0% to 100%. |
| i2c_input_speed_tilt=100 |
Tilt speed for I2C joystick. From 0% to 100%. |
| i2c_input_speed_dutch=100 |
Dutch speed for I2C joystick. From 0% to 100%. |
| osd_enabled=1 |
1 - show OSD 0 - don't show |
| hud_enabled=1 |
1 - show HUD 0 - don't show |
| osd_borders=30 | Set the height of top and bottom black borders below telemetry on HDMI |
| osd_top_offset=20 | Set the vertical top offset 20 pixels for top-sided text labels on HDMI |
| osd_bottom_offset=20 | Set the vertical bottom offset 20 pixels for bottom-sided text labels on HDMI |
| shield_enabled=0 |
0 - don't control a camera shield 1 - control a camera shield |
| shield_timeout=0 | Time (in seconds) for automatical shield close |
| shield_open=1950 | PPM position of servo for shield in opened state (in microseconds) |
| shield_close=1000 | PPM position of servo for shield in closed state (in microseconds) |
Network access
Only if Raspberry Pi with Wi-Fi used
If your Raspberry Pi configured as a Wi-Fi access point (by default) - you can connect to it and open url in browser http://my.cosmostreamer.com or http://192.168.50.1.
Wi-Fi network name (SSID) - "cosmostreamer-wired". Default password - 1234512345
In other case, you need to enter your Raspberry Pi' ip in browser. For example, http://192.168.1.100.
If you using a Mac, Ipad or Iphone (or Windows with iTunes installed) - you can open web interface by the link http://cosmostreamer.local